Simple Steps on How to Make a Decision Tree in Excel
A decision tree is one of the most used and effective graphical representations of possible outcomes of related choices. By using a Decision Tree, a person can weigh actions based on the decision that a person is making. Moreover, a Decision Tree can help you decide on the most critical decision that you are making. However, many people wonder what application they can use to create a decision tree. And if you are unaware, Microsoft Excel is an application you can use to create a decision tree. Microsoft Excel is not just a spreadsheet application, you can also create a Decision Tree with it. So, read this article completely to learn how to make a decision tree in Excel.

- Part 1. How to Create a Decision Tree Using Excel
- Part 2. Pros and Cons of Using Excel to Make a Decision Tree
- Part 3. Best Alternative to Excel on Creating a Decision Tree
- Part 4. FAQs about How to Make a Decision Tree in Excel
Part 1. How to Create a Decision Tree Using Excel
Microsoft Excel is an application that uses spreadsheets to arrange numbers and data concerning formulas and functions. Many professionals use Microsoft Excel for business applications to format and calculate data needed for a particular purpose. It is widely used in business, schools, and many more professions. And below, we will show you the steps on how to create a decision tree using Excel.
First, if Microsoft Excel is already downloaded on your computer, launch it to create a Decision Tree. If the app is not yet downloaded on your device, you can download it on all operating systems, like Windows and Mac.
On the software’s main user interface, go to the Insert tab and click the Shapes option, located in the Illustrations panel.
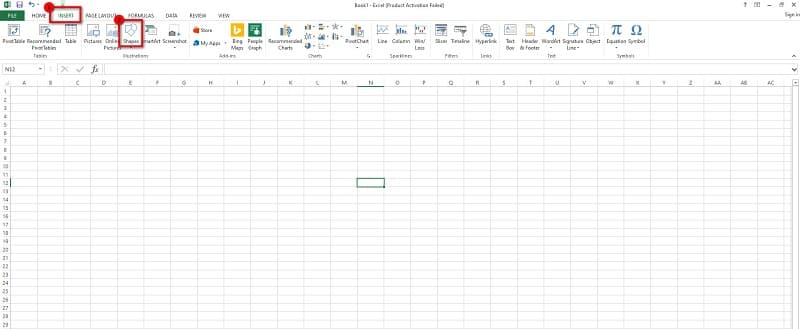
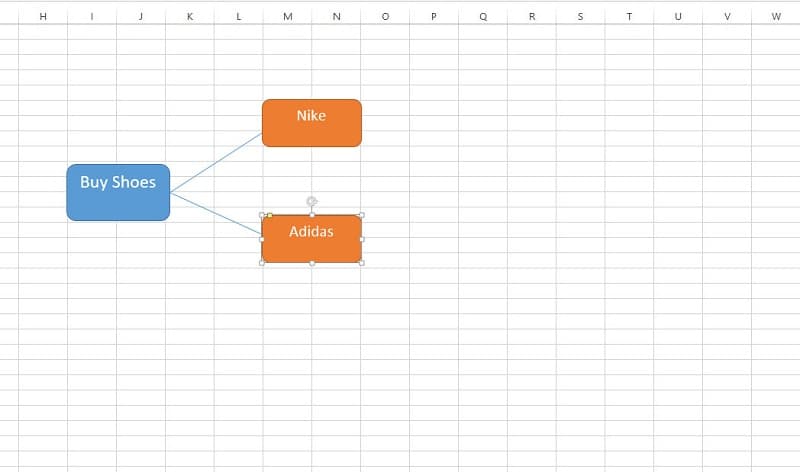
And then, select the shape you want in creating your Decision Tree. But in this tutorial, we will use the rounded rectangle. Click the shape, and draw it on the blank spreadsheet. To add text to the shape, go to Shapes and select the Text Box under the Basic Shapes panel.
Next, go back to Shapes and select the Line to connect the branches of your Decision Tree. Continue this process until you make a decision or what we also call the Conclusion.
Finally, save your output by clicking the File button at the top left corner of the interface, then click Save As and select the destination of your file. And that’s it! Wait for a couple of seconds then your output will be saved on your device.
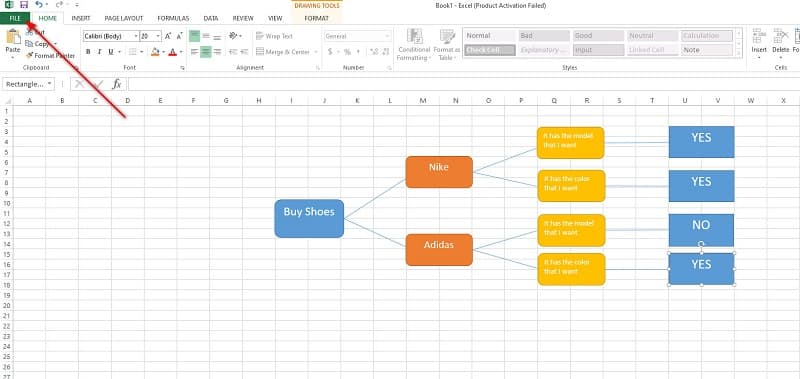
Following the steps above, you can easily build a decision tree using Excel.
Part 2. Pros and Cons of Using Excel to Make a Decision Tree
And just like other tools or applications, Microsoft Excel has its advantages and disadvantages when creating a decision tree.
PROS
- You do not need to create data using other applications to create a decision tree.
- With Microsoft Excel, you can easily create a decision tree.
- It has a beginner-friendly user interface.
- You can easily export your output.
- You can use ready-made templates, which you can find on the SmartArt graphics feature.
- It contains many shapes that you can use for creating a decision tree.
- Excel is supported by all programs and operating systems, like Windows, macOS, and Linux.
CONS
- When you create a decision tree, there are cells around the background.
- It does not have advanced editing features to use.
- It is not formally a decision tree making application.
- You cannot export your decision tree as an image file.
Part 3. Best Alternative to Excel on Creating a Decision Tree
If you prefer using a standard decision tree maker, then we have the best alternative to use. Microsoft Excel allows you to make a decision tree; however, there are many limitations that you may encounter. So, in this part, we will show you another application to make a decision tree.
MindOnMap is one of the best applications for creating a decision tree. This application enables you to make a decision tree easily using the Flowchart, TreeMap, or Right Map option. In addition, you can do many things, like organizational charts, mind maps, flowcharts, tree maps, and more. It also has ready-made templates that you can use for creating a decision tree. And with this application, you can take real-time notes during your class to help you review your lessons effectively.
Moreover, you can use unique and amazing icons to add more spice to your decision tree. What’s even fantastic about this application is that you can share the link with your friends or colleagues to work with your decision tree. Also, you can export your project in different output formats, like PNG, JPG, SVG, PDF, and more. Follow the instructions below if you prefer using MindOnMap to create a decision tree.
Secure Download
Secure Download
How to make a decision tree using MindOnMap
On your browser, search MindOnMap in the search box. Or, you can click this link instead to go directly to their main page. And then, sign-up or login for an account to use MindOnMap.
Click the Create Your Mind Map button on the app's main interface.

And then, click the New button and select the Right Map option, where you will create your Decision Tree.

Afterward, you will see the main node or the primary decision. Click the Main Node, and press Tab on your keyboard to add branches easily. To enter the text on the nodes, just double-click them and type the text you need. Just continue the process until you come up with a decision or a conclusion.

You can share the link with your team or friends to help you work with the Decision Tree. Click the Share button at the interface's top right side, then click Copy Link.

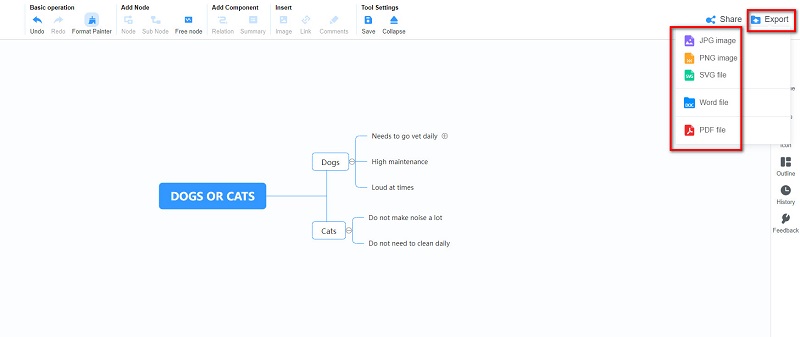
And to Export your output, click the Export button beside the Share button, then select the output format you prefer for your Decision Tree.
Part 4. FAQs about How to Make a Decision Tree in Excel
Are there decision tree templates in Excel?
Yes. You can locate these decision tree templates on the SmartArt graphics in the Illustrations panel under the Insert tab. Here are some templates that you can use as a Decision Tree: Half Circle Organizational Chart, Horizontal Hierarchy, Horizontal Organizational Chart, Labeled Hierarchy, etc.
Can I make a tree diagram using Microsoft Excel?
Yes, you can. Go to the Insert tab, insert Hierarchy Chart and TreeMap. You can also use the recommended charts to create your treemap. Just navigate Insert > Recommended Charts > All Charts.
Can I import a decision tree into Excel?
Of course. If you already have a ready-made decision tree on your device, you can import it to Microsoft Excel for further usage.
Conclusion
Simple, isn’t it? That is how to do a decision tree in Excel. Now that you have read and learned the steps, you can do them independently. But if you are not satisfied with creating a decision tree in Excel, you can always use MindOnMap, which has the best features, like the flowchart, tree map, and right map for creating a decision tree.


